


- Cannabis is a photoperiod plant: vegetative growth occurs under 18+ hours of light; flowering is triggered by switching to 12 hours light / 12 hours dark — autoflowering varieties flower regardless of light schedule
- The complete grow cycle for indoor cannabis is 12–16 weeks: 2–3 week seedling, 4–6 week vegetative, 8–10 week flowering, plus 2-week dry/cure — total 3–4 months from seed to harvest
- The most critical variable in cannabis cultivation is pH: soil 6.0–7.0 and hydro 5.5–6.5 — nutrients become locked out outside these ranges regardless of fertilizer application
- Cannabis has three distinct nutrient phases: high N during veg (N:P:K 3:1:2), transitional (1:3:2) in early flower, and high P/K flush (0:3:3) in late flower
- Vapor Pressure Deficit (VPD) is more useful than relative humidity alone — optimal VPD is 0.4–0.8 kPa in veg and 0.8–1.2 kPa in flowering for maximum transpiration and nutrient uptake
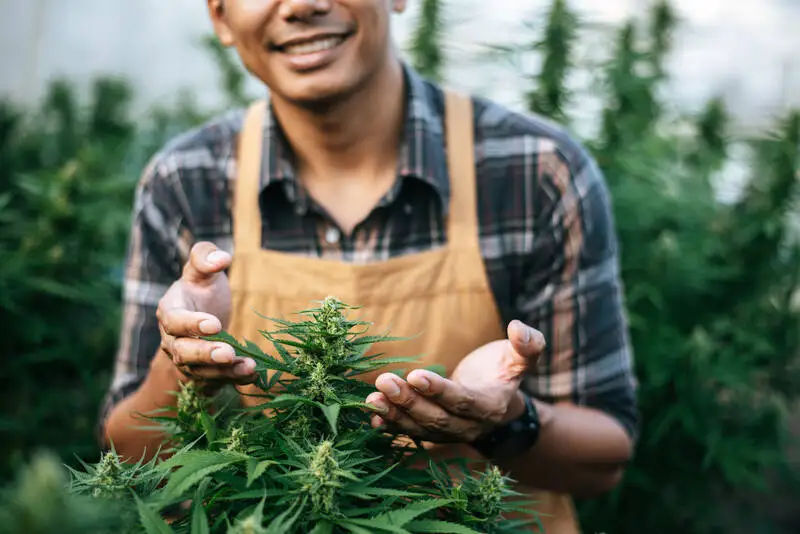
- Training techniques (LST, topping, manifolding, ScrOG) increase yield by 30–100% by creating an even canopy that maximizes light exposure per plant
- Harvesting at peak trichome maturity (70% cloudy, 30% amber under loupe) delivers optimal THC concentration — harvesting early gives more energetic effects; late harvest increases CBN sedation
The Cannabis Life Cycle
Cannabis moves through five distinct developmental stages from seed to harvest. Each stage has specific environmental requirements, and mistakes in one stage compound into problems in the next. The table below summarizes what to expect and watch for in each phase:
| Stage | Duration | Light Schedule | Temp / RH | Key Care | What to Watch For |
|---|---|---|---|---|---|
| Germination | 24–120 hrs | Dark or 18/6 | 21–26°C / 70% RH | Keep moist, not wet; 25°C is ideal | Tap root >1cm before transplanting |
| Seedling | 2–3 weeks | 18/6 | 20–25°C / 60–70% RH | Gentle light, no heavy nutrients yet | Cotyledon yellowing = overwatering or pH issue |
| Vegetative | 4–8 weeks | 18/6 (or 20/4) | 22–28°C / 40–60% RH | High N feeding, training, topping if desired | Stretch, internode spacing, sex pre-flowers (week 4+) |
| Flowering | 8–10 weeks | 12/12 | 20–26°C / 40–50% RH | Transition to P/K nutes, remove males, support colas | Bud rot risk after week 6; trichome colour at week 8+ |
| Harvest / Cure | 2–4 weeks | Dark (drying) | 18–21°C / 45–55% RH (dry) | Slow dry 10–14 days, cure in jars 2–8 weeks | Fast dry = harsh smoke; inadequate cure = hay smell |
Autoflowering strains collapse the photoperiod dependency: they flower based on age (typically 3–4 weeks from germination) regardless of light schedule. This allows 18/6 light throughout the full cycle, lowering electricity costs. The tradeoff is smaller plants, lower yields per plant, and no ability to extend the vegetative phase by adjusting light. For beginners growing a small number of plants, autoflowers offer a faster, simpler first grow. For maximizing yield per square foot, photoperiod genetics under controlled 12/12 trigger remain the industry standard.
Light Requirements by Stage
Cannabis is among the most light-hungry of all cultivated plants. Understanding light requirements at each stage means understanding two measurement units: PPFD (Photosynthetic Photon Flux Density, measured in µmol/m²/s — instantaneous light intensity) and DLI (Daily Light Integral, measured in mol/m²/day — total photons delivered over the day). DLI is the more complete metric: a high PPFD light run for fewer hours can deliver the same DLI as a lower PPFD light run longer.
Vegetative (18/6): PPFD 400–600 µmol/m²/s, DLI target 25–38 mol/m²/day. Blue-spectrum light (400–500nm) promotes compact, vegetative growth and prevents excessive stretch. Most modern full-spectrum LEDs cover this range adequately.
Flowering (12/12): PPFD 600–900 µmol/m²/s, DLI target 38–55 mol/m²/day. Red-spectrum light (620–700nm) drives photosynthesis and bud development. High-quality LED fixtures with far-red diodes (730nm) can trigger Emerson enhancement — a physiological response that increases the efficiency of photosystem II. Adding a 5–15 minute far-red “end-of-day” exposure as lights switch off can accelerate flowering by simulating natural dusk.
CO&sub2; and light intensity: At ambient CO&sub2; (400ppm), cannabis saturates at around 800–1,000 µmol/m²/s. Above this, additional light does not increase photosynthesis without supplemental CO&sub2;. Growers supplementing to 1,200–1,500ppm CO&sub2; can drive photosynthesis at PPFD levels up to 1,500 µmol/m²/s, significantly increasing yield. This is an advanced technique requiring a sealed room, CO&sub2; controller, and higher baseline temperature tolerance (26–30°C).
UV-B trichome enhancement: Brief UV-B exposure (2 hours per day, 50–100mW/m²) during the last 2–3 weeks of flowering is associated with increased THCA synthesis via the THCA synthase enzyme pathway. The plant produces trichomes as a UV-protection mechanism; UV-B stress prompts upregulation. This is an advanced technique applicable to the late-flowering stage only.
Water, pH, and Nutrient Management
Watering frequency: The most common beginner mistake is overwatering. Cannabis roots need both water and oxygen. The correct technique is to water thoroughly until 10–20% runoff flows from the pot, then wait until the medium dries out before watering again (the pot should feel noticeably lighter). In a 5-gallon pot with a healthy plant in mid-veg, this typically means watering every 2–3 days. Seedlings in solo cups may go 4–5 days between waterings.
pH is the master variable. Cannabis takes up specific nutrients only within specific pH ranges. Outside the target range, nutrients are chemically bound in the medium and unavailable to the plant despite being present — a condition called “nutrient lockout.” Target pH: soil 6.0–7.0 (optimal 6.3–6.8); coco coir 5.8–6.3; DWC hydro 5.5–6.5. Measure pH of the water/nutrient solution before watering and measure pH of the runoff water. A runoff pH that differs from input pH by more than 0.5 points indicates a pH imbalance building in the root zone.
Nutrients by stage: Cannabis has distinct macronutrient (N, P, K) requirements at each phase:
- Vegetative (N:P:K 3:1:2): High nitrogen drives leaf and stem growth. Look for nutrients labeled “Grow.” Feed at half the recommended dose until you confirm the plant’s tolerance.
- Early flower transition (N:P:K 1:3:2): Reduce nitrogen to prevent excessive stretch; increase phosphorus to support bud site development.
- Mid-late flower (N:P:K 0:3:3): Nitrogen nearly zero; high phosphorus and potassium drive bud density, resin production, and terpene development. “Bloom” labeled nutrients.
- Final 1–2 weeks (flush): Flush with plain pH’d water to clear residual salts from the medium. This is debated in organic growing contexts where living soil breaks down nutrients continuously, but is standard practice in synthetic nutrient programs.
EC/TDS monitoring: Measure the electrical conductivity (EC) of your nutrient solution and runoff. Seedlings: 0.4–0.8 mS/cm. Veg: 1.2–2.0 mS/cm. Flower: 1.6–2.4 mS/cm. Late flower: 1.2–1.6 mS/cm. Runoff EC significantly higher than input EC indicates salt buildup in the root zone — flush before symptoms appear in the leaves.
Growing Medium Options
The choice of growing medium affects how forgiving the environment is, how fast the plant grows, and how much management precision is required:
| Medium | Setup Cost | Skill Required | Yield Potential | Water Efficiency | Forgiveness | Best For |
|---|---|---|---|---|---|---|
| Soil (organic) | Low | Beginner | Good | Moderate | Very High | First-time growers, organic flavor |
| Coco Coir | Low–Mid | Intermediate | Very Good | Good | Moderate | Faster growth than soil, good yield/cost ratio |
| DWC Hydro | Mid–High | Advanced | Excellent | Very Good | Low | Experienced growers, maximum yield targets |
| Perlite/Aero | High | Advanced | Excellent | Excellent | Very Low | Commercial production, maximum speed |
Coco coir is the sweet spot for intermediate growers: it is an inert medium (like hydro) that holds moisture without waterlogging, buffers pH reasonably well, and allows the aggressive feeding schedules of hydroponics while being far more forgiving to slight overwatering than DWC. Coco requires cal-mag supplementation as it is naturally deficient in calcium and magnesium. Feed daily or every other day at full nutrient strength in late veg and flowering; coco is designed to be fertirrigated frequently rather than watered to dry-out as with soil.
Training Techniques: Maximizing Yield
An untrained cannabis plant grows in a Christmas-tree shape: a dominant main cola with lower branches that receive far less light. Training techniques redistribute energy to multiple bud sites by creating a flat, even canopy where every bud site receives direct light from above. The yield improvement from training ranges from 30–100% depending on technique, genetics, and grow space.
- LST (Low Stress Training): Gently bend and tie down main stems during veg to create a horizontal canopy. Very low risk, no recovery time. Best applied from week 2 of veg through early flowering. Can be done repeatedly. Most forgiving technique for beginners.
- Topping: Cut the main stem above a node to create two main colas from one. Apply once at the 4th or 5th node in veg. Recovery time 5–7 days. Doubles the number of main colas, doubles yield potential in those colas. Can be repeated (mainlining/manifolding).
- FIM (F**k I Missed): Pinch rather than fully cut the growing tip, leaving some tissue. Produces 3–4 new tops rather than topping’s 2. More variable results; useful for growers who want more tops without stress of full topping.
- Manifolding: A planned sequence of topping + LST that creates 8 or 16 even, symmetrical main colas from a single plant. Requires 3–4 weeks extra in veg. High reward, moderate skill. Recovery time for each top: 5–7 days.
- ScrOG (Screen of Green): A horizontal screen is placed 25–35cm above the canopy. Growing tips are tucked under the screen and trained horizontally as they grow, filling the screen before flowering. The result is a perfectly flat canopy at the screen level. Maximizes light per square foot. Best technique for dense indoor grows. Requires planning net placement and timing.
Stop all training at the end of the first week of the 12/12 flip. The plant needs uninterrupted energy to develop bud sites in the first 2 weeks of flowering (the “stretch” phase). Any stress during this period delays bud set and reduces final yield.
Harvest, Drying, and Curing
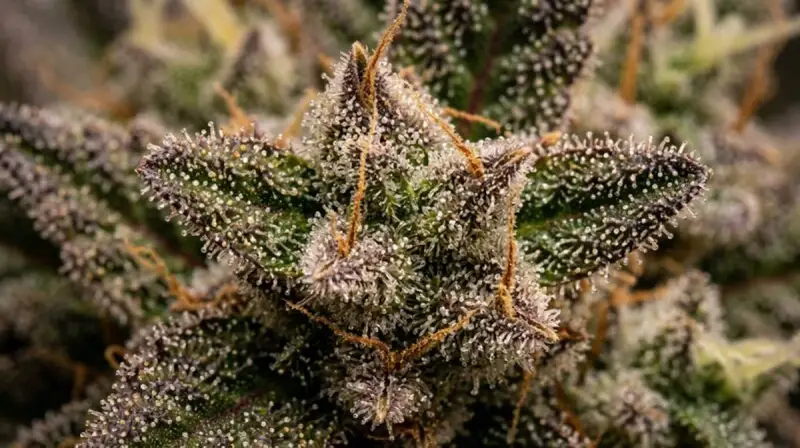
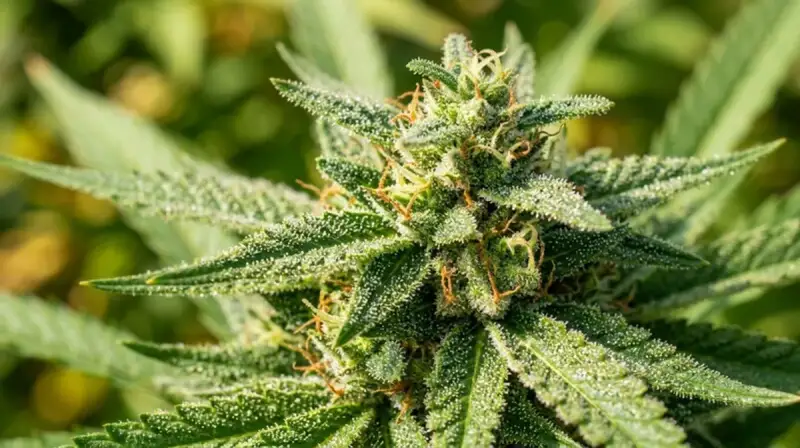
Trichome assessment: Under a 60–100x jeweler’s loupe or digital microscope, examine trichomes on the buds (not sugar leaves, which ripen faster). Clear trichomes: immature, harvest too early. Milky/cloudy: peak THC content, more energetic effect. Amber: THC degrading to CBN, increasingly sedative. The industry-standard harvest target is approximately 70% cloudy / 30% amber for a balanced effect. Harvesting at 100% cloudy and 0% amber gives a “racier,” more energetic high; harvesting at 50%+ amber gives a heavier, more sedative effect. Both are valid choices based on desired outcome.
Flushing: If growing in synthetic nutrients (soil or coco), cease all nutrients 1–2 weeks before harvest and water only with pH’d water. This flushes residual mineral salts from the medium and allows the plant to consume stored nutrients. Signs of a properly flushed plant: yellowing of fan leaves in the final week (normal nitrogen depletion), increasing trichome amber.
Wet vs. dry trim: Wet trimming removes sugar leaves before drying, exposing buds to air directly. Dry trimming leaves sugar leaves on during drying, acting as a moisture buffer for a slower dry. In low humidity environments (below 40% RH), wet trimming risks drying too fast. In high humidity environments (above 60% RH), dry trimming risks mold. For most indoor grows in controlled conditions: dry trim is preferred for terpene preservation.
Drying conditions: Hang or rack buds in a dark room at 18–21°C (60–65°F) and 45–55% relative humidity. Aim for a 10–14 day dry time. Faster drying destroys terpenes and leaves a harsh, grassy taste. The buds are dry enough to jar when small stems snap rather than bend.
Curing protocol: Place trimmed buds in wide-mouth mason jars (or similarly airtight containers) at approximately 62% RH (use Boveda humidity packs for precise control). For the first week: open jars for 15–20 minutes twice daily (“burping”) to exchange moisture-laden air with fresh air. After the first week, reduce to once daily. After 2–3 weeks, once every 2–3 days. A minimum 4-week cure is recommended; 6–8 weeks produces a noticeably smoother, more complex flavor and effect profile. Properly cured cannabis stored at 62% RH and cool temperature remains stable for 12–18 months.
Jordan Price covers cannabis cultivation, growing science, and plant care at ZenWeedGuide. With over a decade of hands-on growing experience across soil, coco, and hydro systems, he writes detailed, technically grounded guides for beginner and experienced cultivators.