


By Jordan Price · Growing Guide · Updated May 2026
- Energy redistribution, not magic: Lollipopping works by eliminating metabolic sinks — low-light bud sites that consume carbohydrates and nutrients without producing high-quality return. Removing them does not create new energy; it redirects existing energy to productive sites.
- Light physics drive the need: The inverse square law means that a bud site twice as far from your light source receives only one quarter of the photon flux. Lower canopy sites at 60–80 cm below the lamp may receive as little as 50–100 µmol/m²/s — well below the 200+ µmol/m²/s needed for meaningful bud development.
- Timing is the most critical variable: Week 2–3 of flower is the established optimal window. Earlier means unnecessary stress before bud development is established; later means disrupting active bud swelling when it matters most.
- Airflow improvement is an underrated benefit: Opening up the lower canopy dramatically improves air circulation, reducing the humidity pockets that create botrytis and powdery mildew conditions in late flower.
- Never remove more than 30% of leaf mass at once: Excessive defoliation in a single session triggers stress responses that temporarily halt photosynthesis. If a second session is needed, allow 7–10 days between sessions.
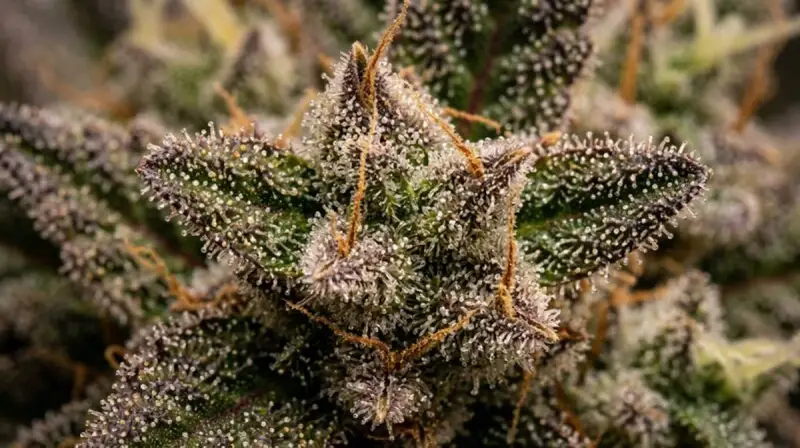
- Popcorn buds are the primary target: Small, airy, underdeveloped bud sites on weak laterals below the canopy consume disproportionate resources and produce low-quality harvest material with poor cannabinoid density.
- Simplifies harvest significantly: A lollipopped plant takes 40–60% less time to trim post-harvest because the lower stems are clear and only the well-developed upper colas require trimming attention.
Why Lollipopping Works: Light Physics and the Energy Sink Principle
Cannabis plants are indeterminate flowering organisms: given sufficient light and nutrients, they will attempt to develop bud sites on every lateral branch at every node. However, the plant’s canopy creates a steep light gradient. By the inverse square law, light intensity falls off as the square of distance — a bud site 60 cm from your light source receives roughly one quarter the photon flux of a site 30 cm away. Upper canopy sites may receive 600–900+ µmol/m²/s, while lower canopy sites receive 50–150 µmol/m²/s from diffused and reflected light alone.
Photosynthesis cannot sustain meaningful bud development at those lower light levels. The light compensation point for actively flowering cannabis — the PPFD level at which photosynthesis and respiration are equal — is approximately 100–200 µmol/m²/s. Sites receiving less than this cannot produce enough carbohydrates to support their own growth, let alone export surplus to developing buds.
These lower bud sites therefore become net consumers: they import sugars, amino acids, and minerals from the plant’s vascular system while producing little in return. This consumption directly competes with upper cola development. Removing them eliminates the competition and allows the plant’s finite metabolic resources to concentrate entirely on the productive upper canopy. For further reading on how light intensity affects canopy penetration, see the LED grow lights PPFD guide.
This principle connects directly to complementary training techniques. Plants that have been topped or FIMmed during vegetative growth produce a multi-cola canopy that maximizes the number of productive upper sites — and therefore also maximizes the benefit of lollipopping the lower canopy. A SCROG setup defines the canopy plane precisely, making the lollipop boundary immediately clear: everything below the screen is removed.
The Science: Auxin Redistribution and Photosynthate Allocation
When lower bud sites and branches are removed, two hormonal and metabolic processes work in the plant’s favor. First, auxin (indole-3-acetic acid) produced by the developing apical buds is no longer being redistributed to lower lateral sites. This frees up the auxin signaling cascade to focus on upper bud sites, promoting cell elongation and pistil development in the main colas.
Second, source-to-sink allocation of photosynthate (primarily sucrose produced in photosynthetically active leaves) shifts entirely to the upper sink tissues. In plant physiology, the strongest sinks — the fastest-growing, most metabolically active tissues — attract the greatest proportion of assimilates through a pressure-driven flow in the phloem. By removing lower sink tissues, you increase the concentration gradient between remaining upper sinks and the source leaves, accelerating assimilate delivery to the main colas.
The net result: more sugar, more phosphorus, more calcium, and more nitrogen flow to the upper bud sites during the critical weeks of trichome development. This translates not only to larger bud volume but to improved resin density and terpene expression in strains that are sensitive to resource availability.
Conservative vs. Aggressive Lollipopping
There are two main schools of thought on how much to remove when lollipopping.
Conservative approach: Remove only the bottom quarter of the plant — just the clearly shaded, weakest material. Keep most fan leaves intact even in the lower-middle canopy. This approach prioritizes stress minimization and is best for less experienced growers, plants that showed any health issues during veg, or strains known for slow recovery.
Aggressive approach: Remove the full bottom third, including all secondary branches and fan leaves below the main canopy plane, and optionally strip some large fan leaves from the middle canopy that are shading bud sites. This approach is practiced in commercial indoor production environments with dialed-in VPD, optimized nutrition, and high-intensity lighting. It maximizes airflow and resource redirection but requires strong, healthy plants and consistent environmental management.
For most home growers, the conservative-to-moderate range is appropriate: remove everything clearly in the bottom third, be conservative with anything borderline, and do not strip middle-canopy fan leaves at the same session.
Step-by-Step Lollipopping Technique
| Step | Action | Notes |
|---|---|---|
| 1. Prepare tools | Sterilize pruning scissors or a scalpel with isopropyl alcohol (70%+) | Unsterilized tools transmit Botrytis, Fusarium, and bacterial infections between plants |
| 2. Assess the canopy | Stand at plant height and identify the lowest point of the well-lit upper canopy | This is your lollipop line — everything below it is a candidate for removal |
| 3. Mark the third | Measure or visually identify the bottom third from substrate to canopy line | In a 90 cm plant, the bottom 30 cm is the removal zone |
| 4. Remove bud sites first | Cut all bud sites and lateral branches within the removal zone flush to the main stem | Cut cleanly; do not tear or leave stubs that can harbor infection |
| 5. Remove fan leaves | Pull or cut fan leaves in the removal zone that are completely shaded | Leave fan leaves in the middle and upper canopy untouched at this session |
| 6. Clean up debris | Remove all cut material from the grow space immediately | Dead plant matter on the substrate is a vector for Botrytis and fungus gnats |
| 7. Post-op environment | Ensure VPD is in the 0.8–1.2 kPa range; do not overfeed for 24–48 hours | Optimal VPD supports transpiration-driven recovery; excess nutrients stress open wounds |
| 8. Monitor recovery | Check for stress symptoms over 3–5 days (drooping, yellowing, slow growth) | Some temporary slowdown is normal; prolonged stress signals over-defoliation |
Lollipopping Timing by Stage
| Stage | Timing | Action | Reason |
|---|---|---|---|
| Late veg | 1–2 days before flip | Optional: remove obviously dead/dying lower growth only | Minimal stress before the photoperiod shift; do not full-lollipop yet |
| Transition (Flip Day 0–7) | First week of 12/12 | Observe; do not cut | Plant redirecting energy to flower initiation; minimize all stress |
| Early flower (Flip Day 7–14) — primary window | Stretch underway; pre-structures forming | Full lollipopping session: bottom third removal | Structures visible enough to identify productive sites; active bud dev not yet started |
| Week 3 flower (secondary) | Day 18–22 | Light defoliation only: remove fan leaves blocking bud sites | Not a second lollipop; targeted fan leaf removal to improve bud site light exposure |
| Week 4+ | Active bud swelling | No defoliation | Stress now directly reduces terpene production and final weight; hands off |
| Week 6–7 (pre-harvest) | 10–14 days before harvest | Optional: strip remaining large fan leaves only if used for late-stage light penetration | Controversial; some growers strip late to improve airflow; evidence mixed on yield benefit |
What to Remove vs. Keep
| Plant Part | Decision | Reason |
|---|---|---|
| All growth in bottom third of plant | Remove | Below light penetration threshold; net energy consumer |
| Weak lateral branches with thin stems | Remove | Will only produce sparse popcorn buds; not worth resource investment |
| Bud sites not receiving direct light | Remove | Airy, leafy, low-density buds; consume more than they produce |
| Fan leaves in shaded lower canopy | Remove | No photosynthetic value in shade; blocking airflow |
| Upper canopy fan leaves | Keep (until week 3 defoliation) | Primary photosynthesis surface; removing at same time as lollipopping is double-stress |
| Strong lateral branches in upper two-thirds | Keep | Will develop into secondary colas with direct light |
| Any branch with well-developed bud site, regardless of height | Evaluate: keep if receiving direct light | If it has direct light exposure, it has productive potential |
| Crossed or inward-facing branches blocking airflow | Remove | Airflow restriction in late flower promotes Botrytis regardless of light |
Lollipopping vs. Schwazzing: Key Differences
Lollipopping and schwazzing are both defoliation techniques, but they differ significantly in scope, timing, and appropriate use cases.
Lollipopping: Performed once at week 2–3 of flower. Targets the bottom third of the plant — primarily bud sites, lateral branches, and fan leaves below the canopy. Removes 15–30% of total plant biomass. Appropriate for all growing levels; low risk when performed correctly.
Schwazzing (Colorado Topping Method): Developed by Joshua Haupt and documented in the book “Three A Light.” Removes virtually all large fan leaves at two specific points: Day 1 of flower (immediately at the flip) and Day 21 of flower. The Day 1 session removes as many as 40–60% of all leaves on the plant. This is an extreme technique developed in commercial environments with 1,000W HPS lighting per plant (hence “three a light” — three pounds per 1,000W fixture), high CO2 supplementation, and precisely calibrated nutrition. In under-lit or under-fed environments, schwazzing will severely reduce yields. It is not appropriate for beginners or home growers without fully dialed-in systems.
| Attribute | Lollipopping | Schwazzing |
|---|---|---|
| Sessions | 1 (+ optional light week 3) | 2 (Day 1 and Day 21 of flower) |
| Material removed | Bottom third only | Nearly all fan leaves both sessions |
| % leaf mass removed | 15–30% | 50–80%+ per session |
| Appropriate lighting | 600W+ per m² | 1,000W HPS or equivalent per plant (commercial) |
| Risk level | Low (when timed correctly) | High (catastrophic if environment not dialed in) |
| Recommended for beginners | Yes | No |
| Primary benefit | Energy redistribution + airflow | Maximum energy redistribution; massive canopy bud exposure |
Yield Effects: What Grower Data Shows
Controlled comparisons between lollipopped and unlollipopped plants of the same strain, same environment, and same veg time consistently show the following patterns in experienced grower reports:
- Upper cola weight per plant: +15–25% in lollipopped plants vs. controls
- Total plant weight (including all lower popcorn): roughly equal or slightly lower in lollipopped plants
- Harvestable high-quality yield (excluding sub-standard popcorn): +20–30% in lollipopped plants
- Post-harvest trimming time: 40–60% reduction in lollipopped plants
- Reported incidence of Botrytis in late flower: lower in lollipopped plants due to improved airflow
| Metric | Unlollipopped | Lollipopped | Change |
|---|---|---|---|
| Upper cola weight | Baseline | +15–25% | Positive |
| Total plant weight | Baseline | ±0 to −5% | Neutral to slightly lower |
| Harvestable premium yield | Baseline | +20–30% | Positive |
| Trim time post-harvest | Baseline | −40–60% | Strongly positive |
| Late-flower mold risk | Higher | Lower | Positive |
Strain Suitability for Lollipopping
| Strain Type | Lollipopping Suitability | Recommendation | Notes |
|---|---|---|---|
| Indica-dominant (compact, bushy) | Excellent | Highly recommended | Dense canopy creates many shaded lower sites; lollipopping effect is especially dramatic |
| Indica-dominant fast flower | Good | Recommended; keep conservative | Shorter flowering window means less recovery time; remove bottom third only |
| Balanced hybrid (50/50) | Excellent | Highly recommended | Most commercial strains; standard protocol applies |
| Sativa-dominant (tall, open) | Good; more cautious | Recommended with care | Open branching structure means fewer shaded sites; be conservative on leaf removal |
| Extreme sativa (12+ week flower) | Moderate | Light lollipopping only | Very long flowering window but also high stress sensitivity; minimize foliage removal |
| Autoflower | Not recommended | Avoid or keep extremely light | Fixed life cycle; any defoliation stress reduces final yield with no recovery time available |
| High-stress recovery strains (Haze types) | Moderate | Time carefully; observe post-op | Some Haze genetics are particularly sensitive to defoliation; monitor closely for 48 hours after |
Indoor vs. Outdoor: When Lollipopping Makes Sense
Indoor growing: Lollipopping is almost universally beneficial indoors because artificial light sources are fixed and create sharp, predictable light gradients. The lowest sections of an indoor canopy are in deep shade by definition, and popcorn bud production there is inevitable without intervention. In any setup with a fixed overhead light — HPS, CMH, or LED — lollipopping should be considered standard practice.
Outdoor growing: The calculus is different outdoors. The sun moves through the sky, providing diffuse illumination from different angles throughout the day. This means lower canopy bud sites receive more light exposure than in an indoor setup where light is fixed directly overhead. The inverse square law still applies, but the practical effect is less severe. Many outdoor growers still lollipop to improve airflow and reduce pest and mold pressure, but the yield benefit is less pronounced than indoors. For large outdoor plants where the canopy is dense, selective removal of the innermost branches — rather than a strict bottom-third removal — is a common adaptation.
Common Mistakes and How to Avoid Them
| Mistake | Symptom | Prevention / Fix |
|---|---|---|
| Lollipopping too early (before stretch) | Removing sites that would have been productive upper colas after stretch | Wait until stretch is underway (Flip Day 7+) before assessing removal zone |
| Lollipopping too late (after week 3) | Stress during active bud swelling; reduced final weight and terpene production | Stick to week 2–3 window; skip lollipopping if past week 3 |
| Removing too much leaf mass | Wilting, slow recovery, pale new growth, reduced photosynthesis | Never exceed 30% total leaf mass in one session; space sessions 7–10 days apart |
| Using unsterilized tools | Cut sites showing signs of infection (browning, mold) | Wipe scissors with 70%+ isopropyl between each plant and ideally between each cut |
| Leaving stubs on main stem | Stub rots and creates infection site | Cut flush to main stem; clean cuts heal faster and cleaner |
| Defoliating during environmental stress | Compound stress: heat event + defoliation = severe growth pause | Lollipop only when temperature, humidity, and VPD are dialed in |
| Removing fan leaves from upper canopy at same session | Double-stress: too much removed at once; photosynthesis crash | Keep upper fan leaves at lollipop time; address them separately at week 3 if needed |
Combining Lollipopping with Other Techniques
| Technique | When in Grow | Combined Benefit with Lollipopping | Notes |
|---|---|---|---|
| Topping / FIM | Veg (3–5 nodes) | Multiple colas in upper canopy to develop post-lollipop; maximizes the energy-redistribution benefit | Creates the multi-cola structure that makes lollipopping most effective |
| LST (Low Stress Training) | Veg through flip | Even canopy height ensures all upper colas are at equal distance from light after lollipop | LST + lollipop = highly uniform canopy with all productive sites receiving equal PPFD |
| SCROG | Late veg; fill before flip | SCROG screen defines the canopy plane exactly; everything below screen = natural lollipop boundary | The screen makes it visually obvious what to remove |
| SOG (Sea of Green) | Flip quickly from clone or seed | SOG grows many small plants; lollipopping the lower half of each plant is essential — only the single top cola per plant needs to develop | In SOG, lollipopping is effectively mandatory; plant count strategy replaces multi-cola strategy |
| Week 3 defoliation | Flower week 3 | Removes large fan leaves that are now blocking already-swelling bud sites | Second intervention; much lighter than lollipopping; focus on bud-site light exposure only |
| Manifolding / Mainlining | Early veg; multiple topping rounds | Manifolded plant has an extremely even canopy with all colas at identical heights — lollipopping the single bare manifold stem is simple and effective | The bare manifold stem below the node junction is naturally lollipopped by the manifolding process itself |
Recovery Protocol After Lollipopping
Most healthy plants show minimal visible stress after a correctly timed and sized lollipopping session. However, if you observe signs of stress (leaves pointing slightly down, slower growth, pale new growth), the following protocol supports faster recovery:
- Hold nutrients for 24–48 hours: The plant’s reduced leaf surface temporarily reduces transpiration and nutrient demand. Continuing to feed at full rates can cause tip burn or salt stress at the root zone.
- Dial in VPD (0.8–1.2 kPa): Correct vapor pressure deficit supports transpiration-driven recovery. High VPD (dry air) stresses an already-stressed plant; low VPD (humid, stagnant air) increases mold risk on fresh cuts.
- Maintain lights at normal distance: Do not reduce light intensity — the plant needs photosynthetic capacity to rebuild. If anything, ensure PPFD is at the upper end of the appropriate range.
- Monitor for 3–5 days: Normal recovery is visible within 48–72 hours. If the plant has not resumed normal growth by day 5, investigate whether stress has a secondary cause (root issues, pH drift, heat stress).